Winter Accessories for Wedding Photographers

Oh my goodness, it’s COLD out there, right? We are in the THICK of winter so I wanted to share some of my recent good finds on how to stay warm if and when you have to go outside and photograph a wedding or event.

WinterAccessoriesforWeddingPhotographers.jpg

L.L. Bean Midweight & Heavy Base layer Leggings - I’m so happy I found this super warm, thick, base layer leggings from L.L. Bean. They are warm enough to keep you toasty when you are outside braving the snow and wind but thin enough that you can still pull and zip your jeans. I purchased the Heavy Base Layer (which is now currently sold out) but the mid-weight pants are a great option.

Fleece Tights - Where have you been all my life? I picked a pair from Target that my friend recommended and I’m in heaven. They are so crazy cozy it’s amazing. They are thicker than normal tights but not thick enough that you look bulky in your skirt or dress. I wore these when I had to travel around new york city in a skirt and was very warm when walking around town. I was worried I might be too “hot” when I was inside and working but oddly enough, I was cool and forgot I was even wearing them. These are a MUST HAVE for me and you can certainly wear them under your jeans/pants if you wanted too.

Fleece Lined Gloves - Fleece again, are we sensing a theme? I picked up a pair of these fleece lined tech gloves so I could use my phone while I was outside on a job. The best thing about fleece is that they keep all the wind out which I always find is one of the worst parts about shooting outside. I can handle the cold temps but I can’t handle the wind and now, I don’t have too!

Fleece Lined Hat - I always am searching for the cutest pom-pom hat each and every winter (ammiiiright??). This year I picked up a j.crew hat that looks just like this one BUT it’s not lined, so I’m not wearing it anymore. This hat is so warm and adorable (if I do say so myself!) so it keeps my head warm while I’m outside. Thank goodness for fleece, right??


Want more Tea? One-on-One Coaching is now available! Find out more here!

Stay in the know! Subscribe to our newsletter, podcast, join our facebook group and be sure to follow @jainekershner on Instagram for the latest Tea with Jainé IG TV episode.

Greetabl Discount - Save 20% Greetabl and Greetabl Insider Pro. Use code JKERSHNER at check out.

Interested in collaborating? Please fill out our contact page and say hello!
New Favorite Tech Accessories for Wedding Photographers

It’s a New Year and I thought I would share some of my favorite tech accessories that might help you organize your life. I’m always on the look out for new tech accessories that are smaller, better, and faster (aren’t we all?) that fit discreetly into my gear bag or handbag. Here are my new (and some old) favorites!! But before we get into the gear, I should mention that if you aren’t already signed up for Ebates or Honey - you are seriously missing out on money every time you shop online. Let me explain why…

1 - The Honey is fully integrated with Amazon which is amazing. Once you sign up and install the plugin in your browser (I use Chrome) it will start a Honey list for you whenever you put things in your Amazon cart. After you add an item, it will then search all of Amazon and get you the lowest price on the site. You just have click the button, and it switches your cart automatically and boom! you’re done!! It’s so easy and FREE it’s crazy. Honey will email you if it finds items on your list are now on sale or listed for a lower price which is so helpful! They do have a small cash back option but it’s only 1% which isn’t a huge savings but I LOVE it for Amazon!! Sign Up by using this link.

2 - Ebates is THE BEST! They have saved me SO much money over the last two years, it’s crazy!! Again you sign up and create a FREE account and install the plug-in in your web browser. They are partners with 1,000’s of online relators and when you buy from a site that offers an Ebates deal, you’ll see it pop up in your browser and you just click the link, they redirect you using their links (this is how they make money and you get to SAVE money!) then you make your purchase as usual. I use this ALL-THE-TIME (especially for my Camera Gear and Technology purchases) and I will receive anywhere from 2-5% cash back. Also, you can use it on travel and hotel deals (hello, destination wedding photographers!!) and so much more. Sign up by using this link.

Ok, so now I told you how to save some money, let me tell you about my fave Tech Accessories :)

Tech Accessories For Wedding Photographers

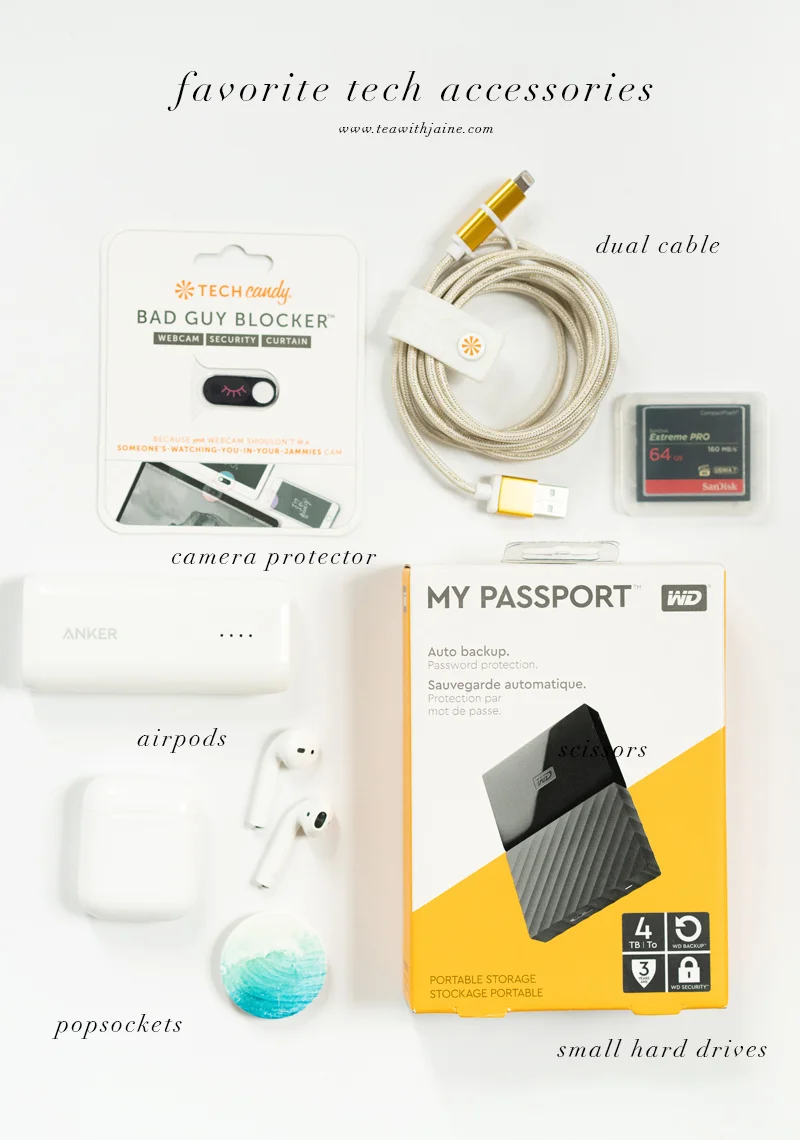
Western Digital 4TB Passport Hard Drive - I’ve mentioned these portable hard drives before but I just upgraded my new drives to the 4TB which is a HUGE amount of space. I cannot believe that you can get a 4TB drive for under $100. I purchased two of them and now I’m all set for this season and most likely next wedding season as well!

SanDisk 64 GB Compact Flash Memory Card - I don’t know what took me so long to jump on the 64GB bandwagon but I’m so happy that I did because now I can photograph each wedding in under two 64GB Compact Flash cards. Also, I had this item in my Amazon cart and Honey emailed me that there was a price drop (see what I mean!!) so I saved $10 on this card because a seller was having a sale. I’m telling you, you HAVE to sign up!!

Apple Airpods - I don’t know about you but when I use my phone for phone calls, my skin breaks out. Our phones are so dirty that I was using my headphones all the time but the cord felt limiting to me. I couldn’t walk around without carrying my phone while on client discovery calls. So I invested in the Apple Airpods and I’m SO in love with them and the charging case. They sound great, easy to use, charge last a long time, and I love that they hide in my hair!

Tile Mate - Ok INSTAGRAM ad’s you got me here! I kept seeing this Ad and then I saw another photographer use them in a way that my own lightbulb moment went off and I said “I have to get them!”. I am using the Tile Mate tracking disks in all of my camera bags and backpacks just in case one goes missing. I can use the Tile app to track my bags and have a bit of peace of mind when I leave the reception room for a few minutes. These have replaceable batteries which should last up to 2 years before needing to be changed. I always get scared thinking that someone is going to walk off with my gear (which I do lock up thanks to the built in safety locks from ThinkTanks) but now I have a way to track them ASAP if they were to go missing.

Tech Candy Bad Guy Blocker - Honestly, Tech Candy is my new favorite gear company! They have some of the greatest inventions EVER! This Bad Guy Blocker is genius! We all know that someone can get onto your computer, ipad, or iphone, and start your camera up and RECORD you without you even knowing. Yes, they can turn off the recording light as well so when I saw this little but GENIUS device on GMA DEALS (again, need to follow them!!) I bought several for my studio and home. It’s one layer of security I love having on my computer.

Tech Candy Dynamic Duo Woven USB Cable for Apple and Samsung - This super cute (hello GOLD!) USB cable is awesome! Not only will it charge my iPhone but the dual head can even charge a Samsung phone as well which I think is handy to have on hand (especially on a wedding day) because if someone needs a charge and they have a different device, this USB cable can handle both phones!

Tech Candy Cord Keeper in White - A large rubber tie to keep your cord organized in your bag.

Anker Candy Bar Sized Ultra Compact Portable Charger - I used to have the larger version of this item but I didn’t like carrying it around with me because it took up too much space in my bag and was heavy. So, when I saw my friend using this Ultra Compact Portable Charger, I order it from Amazon immediately. Now I carry it my bag all the time and it’s perfect for my Shootsac on wedding days.

PopSockets - I get asked how do I hold my phone when I create my Instagram stories while I’m walking. Welp, the secret is that I use a PopSocket on the back of my phone. It’s a removable and reusable (yes, it can be removed and used all over your phone or a new case!) collapsible grip for your iPhone. I am a HUGE fan of these little guys. I cannot use my phone without a PopSocket! They come in so many fun colors, combos, and you can even upload your own photos or logo and create your own.


Want more Tea? One-on-One Coaching is now available! Find out more here!

Stay in the know! Subscribe to our newsletter, podcast, join our facebook group and be sure to follow @jainekershner on Instagram for the latest Tea with Jainé IG TV episode.

Greetabl Discount - Save 20% Greetabl and Greetabl Insider Pro. Use code JKERSHNER at check out.

Interested in collaborating? Please fill out our contact page and say hello!

Wedding Photographer Detail Styling Kit Accessories - Updated!!

Over the course of the past wedding season, I streamlined my gear (finally!!), bought some new shoes, and cleaned up my styling kit! In doing so, I fell in love with a few new items that I couldn’t wait to share with you! I’ve listed my new faves below and even a few less expensive alternatives to help you update your styling kit too. I hope you find it helpful - enjoy!!

Wedding Photographer Detail Styling Kit Accessories

Styling Surfaces

Locust Collection’s rollable, double sided linen and/or velvet styling surfaces have quickly replaced my Heirloom Bindery styling boards. I absolutely LOVE how portable they are and how I can carry them easily from the Brides getting location, to the ceremony, and finally to the wedding venue without having to worry about it taking up too much space, getting ruined, and bumping into people. It comes in a clear, round, pvc tube canister that fits snugly in my existing camera bag.

However, my only issue was that since they are double sided (yay, two color choices!!) I was constantly worried about the floor side getting dirty. I didn’t have a protective sheet to carry with me and honestly, I didn’t want too! Well, they thought of a solution and released a vinyl protector cover to keep your surfaces clean while styling - GENIUS!! Seriously, it’s so worth the investment and I hope Kate comes out with new colors each season.

Clear Travel Organizer

This is definitely one of my biggest pet-peeves for several years now because I could never SEE all of my styling items in one place. My ring boxes, ribbons, vintage stamps, and all my extras were stored in a few different bags so if I didn’t have that bag with me, I wouldn’t end up using the items. UGH! So one day I woke up and headed over to the Container Store and browsed all of the aisles till I found my perfect box!! Their Clear Large Infinite Divider box is my savior - literally! I can fit ALL of my ring boxes, silk and velvet ribbons, tiny plates, floral frogs, dental wax, small clear acrylic blocks, cute scissors and vintage stamps. Once it was all organized, I could FINALLY see all my styling props in ONE place - YAY!! Oh, and it’s 100% portable so I can just carry it with me from room to room and it keeps me from over buying and purchasing duplicates which I discovered after I took everything out (Oops!!) - a bonus I didn’t even think about till afterwards. Here is another option here with three sections.

Ring Boxes

I purchased two new velvet ring boxes from Voeu Du Cour and they are so so lovely! I like the octagon shape and pretty velvet colors (I have a pink and blue). They run sales every few months so I would sign up for their mailing and follow them on Instagram to stay in the know!

Large Acrylic Styling Blocks

So, I was really hoping I wasn’t going to like this styling block set from Heirloom Bindery, but I do :( I really really do but gosh, they are expensive AF but you can totally score a less expensive set right here and here - I researched it for you! The reason I like them is because the styling blocks are bigger and the invitations can lay flat on them without needed a second block for balance. I bought them when I had some money in my paypal account and they were on sale, SOOOOO it wasn’t too bad on my wallet but pick up the replicas, it’s the exact same thing - promise!!

Vintage Inspired Gold Scissors

These vintage inspired Florentine gold scissors from Studio Carta are so so pretty! They are the perfect bit of gold in your wedding detail flat lay AND they come in handy when you actually need to cut ribbon or stray strings off of your brides dress (#truestory) so I’m happy to have them in my new travel organizer at the ready. I also have these stork scissors which are just as adorable and great for styling!

Small Gold Styling Dishes

Ok, I’ll admit it. Late at night I will search Anthropologie website to see what is new and (more likely!) what is on sale. I love browsing their home section because they have a great team of buyers and you can find some gems in there. When I found these gold trinket dishes from Anthro, I put them in my cart and immediately checked out - BOOM!! I think they are so cute and perfect for styling!! I will be using this dish often and I can always just photoshop out the New York latitude information in post production.

A Behind The Scenes Look at me Styling on a Wedding day!

Ok, so here’s a photo of me in all my styling glory on an actual wedding day from this past season - messy hair and ALL!! Once you get past that, you’ll see that I have my new travel organizer by my side, my iphone layed out with my pre-styled wedding invitation layout that I’ve done a few days prior to the wedding to save me time on the actual wedding day (awesome tip!!), and my Contax 645 film camera ready to take the photo. It’s always exciting when it comes together!!

So what’s in your kit? I would love to hear your comments and finds in the comments below!! xo - Jainé

Behind the Scenes Photo of Styling a Wedding Invitation

Want more Tea? One-on-One Coaching is now available! Find out more here!

Stay in the know! Subscribe to our newsletter, podcast, join our facebook group and be sure to follow @jainekershner on Instagram for the latest Tea with Jainé IG TV episode.

Greetabl Discount - Save 20% Greetabl and Greetabl Insider Pro. Use code JKERSHNER at check out.

Interested in collaborating? Please fill out our contact page and say hello!
My Favorite Camera Lenses to Use Throughout a Wedding Day

One of the most common questions I receive is "what lens do you use?" and "what is your favorite lens to use on a wedding day?". I thought that this would be a great topic to discuss on the blog and over on my Instagram IGTV channel. I use several lenses throughout the course of a wedding but I definitely have my favorites and must-have lenses. I've listed each lens below including why I love it and how I use it for each part of the wedding. 

Oh, and I should mention that I do not use zoom lenses. Yep, you read that right. From the compression, higher aperture's and slower speeds just do not work for me in my own wedding photography. I prefer prime lenses for their speed, low light capabilities, and overall sharpness. They are, however, VERY expensive and unfortunately there is no way around the price of prime lens so if you can find a good one used, I say grab it while you can!  I hope its helpful!!

BestLensesForWeddingPhotographers-50mm.jpg

Let's start with my all time ride or die lens - the 50mm 1.4. I absolutely love the 50mm focal length because it's as close to our own eyes as possible. I love that there is no distortion and the perspective is exactly how we see it. It's very flattering on our faces and bodies keeping everything as natural as possible. I have two 50mm's but the one that spends 95% of the time on my camera is the 50mm 1.4 Sigma Art lens for Nikon. This lens is simply the best 50mm out there in my humble opinion. It's unbelievable sharp (which I actually turn down in post-processing) and is a true workhorse. I purchased this lens 3 years ago and it hasn't left my side since! I photograph everything from the details, getting ready, bridal portraits, bride and groom photos, reception details, wedding toast and speeches with this lens. However, when I do get to the reception, I will switch out the heavier Sigma lens for my lighter Nikon 50mm 1.4G. This lens is so small and light that it's perfect for receptions when my back starts to ache from running around all day. This lens has zero distortion or vignetting (dark shading at the corners of the frame) which is exactly why I prefer the 50mm lens to any other. Also, the 1.4 aperture allows me to shoot very wide open and let in a lot of light in low light situations like wedding receptions or sparkler exits. This is hands down my number ONE recommendation for any wedding photographer looking to build their gear kit. It's a must-have, can't live without kind of lens for me!

BestLensesForWeddingPhotographers-35mm.jpg

the 35mm 1.4 Lens is a fantastic wide angle lens that has very minimal to no distortion on the edges of the frame. The 35mm is the perfect lens for those tight hotel rooms or stunning ceremony locations. I will use the 35mm for getting ready photos in small hotel rooms. I always use this lens for clean wide ceremony photos just after the bride and groom have walked down the aisle. This is the perfect time to take a few stunning wide photos of the ceremony space with everyone seated so the couple can remember what it looked like. The 35mm is great for large bridal party shots and always on my camera body for family formals. Especially, the extended family! This lens is great for cocktail hour photos when asking guests to smile for the camera. Last, I will use this lens for the first dance, father-daughter/mother-son dances and speeches/toasts to include more of the reception room in the photos before switching to a tighter lens. When guests are eating, I like to include a few ambient photos of the space so the couple can get a full sense of their wedding venue during their reception. I think it's a nice way to add to more photos into their final wedding gallery. I will put the 35mm away after the last toast and switch it out for a wider, lighter lens. (see below). A less expensive option, would be the 35mm 1.4 Sigma Art Lens for Nikon.

BestLensesForWeddingPhotographers-85mm.jpg

the 85mm 1.4 Lens is a beast! She is perfect for getting in close without being noticed and still has the power and speed of a prime lens. I use the 85mm during my engagement sessions when we are just starting and couples can be a bit nervous. I'll walk away and give them an action to do and capture them from afar so they can start to get comfortable. I like that I can get a close up shot without being directly in front of them. I love this lens for wedding ceremonies and getting close up reactions from family members, the bride and groom and wedding guests during the service. It also produces the prettiest bokeh (blurry background) in the photos. I always use this lens during the reception for couples first dance, parent dances, speeches and toasts. It's just the right compression with no distortion to create a beautiful photos capturing real authentic moments. I will say that it's incredibly HEAVY (all that glass!!) and once the last speech is done, it's put back in my rollie and it's finished for the night.

BestLensesForWeddingPhotographers-105mm.jpg

The 105 Macro 2.8G Lens has just one purpose in my gear collection. It's for ring detail shots and ring shots alone. It's an expensive lens for just one thing (I KNOW!) but it's worth every penny to make those epic ring shots for your couples. I manually focus this lens around f/6.3, f/8, or even f/11 to created a incredible detail shot of the rings. Since it's a macro lens, the compression and depth of field are still extremely low at higher apertures BUT shooting higher lets you get the prongs, diamonds, engravings in focus each and every time. I do manually focus this lens because the autofocus is just a waste on a macro images. I usually get very low to my subject (the rings) and take my time manually focusing my shot. I'm usually sweating at this point during the detail photo process because of all the concentration I have to do to nail the foucs. It's not a pretty sight!!

BestLensesForWeddingPhotographers-28mm.jpg

The 28mm 1.8G Lens is perfect for wedding reception dancing photos! I purchased this lens a few years ago when it was released from Nikon and boy, do I LOVE it! It's so little, light and the perfect wide angel lens for getting in close on the dance floor and capturing all the action. I'm usually in the middle of the dance floor (I have several bruises to prove it!) with the 28mm capturing really fun wide shots from the heart of the party. There is some distortion on the edges of the images but that is to be expected with such a wide lens. I'm ok with this look during the reception but only at the receptions! It's a prime lens which means it's still fast in low light situations (ie. candlelight dinners, receptions) which is exactly why I prefer this lens to a 24-70mm 2.8 Zoom. In my opinion, it's just too slow and doesn't open up wide enough to let in the pretty ambient light I love for my style of photography. My back loves this lens too because it's so light and easy to carry around for several hours during the reception.

BestLensesForWeddingPhotographers-135mm.jpg

The 135mm 2.0 Lens sits in my bag 95% of the time throughout a wedding day. Since I do not use zoom lenses, I needed a lens that had a longer focal point past 85mm but was still sharp enough to create great images. I found this 135mm Lens from Nikon used and it's amazing for ceremonies where I'm not allowed to be in the first few aisles. Some churches have very strict rules about where the photographer and videographers are allowed to be during the actual ceremony, so having this long prime lens in my kit is definitely handy in those less common situations. It's a 2.0 aperture which is just fast enough to let in a lot of light if needed in a dark church or synagogue. Usually, I have already spoken with the facility director and know what my limitations are for the ceremony space, so I already know if I need to dust off this lens and use the day of my wedding. It's a great long prime lens to have "just in case" I need it and I always like to be prepared. I do, however, love when my second photographer has a 70-200mm for the ceremony to get in nice and tight to the Bride and Groom or reactions from the guests. It's a great addition to the couples overall wedding gallery but not a lens I'm going to purchase anytime soon.

And finally, I also use the Black Rapid LensBling Caps on each of my lenses so I can quickly see which lens I'm reaching for inside my Shootsac or Thinktank Rollie. They are so helpful and by the end of the night, I can never find any of my front or rear lens caps. It's the truth!!

So, those are MY favorite lenses. What are yours? I'd love to hear from you jn the comment section below. Am I missing any amazing lens options out there?!


Want more Tea? One-on-One Coaching is now available! Find our more here!

Stay in the know! Subscribe to our newsletter, podcast, join our facebook group and be sure to follow brklynivew on Instagram for the latest Tea with Jainé IG TV episode.

Greetabl Discount - Save 20% Greetabl and Greetabl Insider Pro. Use code BRKLYNVIEW at check out.

Interested in collaborating? Please fill out our contact page and say hello!

How I Backup and Archive My Wedding Photography

I was recently asked by one of my viewers what is my process after the wedding has been photographed. She wanted to know what I do after each wedding and how do I backup and archive my photos, which I thought would be a great topic to discuss. However, I'd like to preface this post with a friendly disclaimer that this is just my way of doing things. There is absolutely no right or wrong way to do something but I would strongly suggest that you have one additional back up somewhere other than your on camera and computer. I'm happy to share my some-what lengthly data backup and archiving process so grab a fresh cup of tea, and get ready to read along!

How-I-Backup-Archive-My-Wedding-Photography.jpg

My Gear:

The most important part about backing up and archiving system starts with what gear you invest your money in. Without reliable gear, it really won't matter how you back it up. This is what I use:

Digital Camera - I have two Nikon D810 cameras in my gear kit at all times. They are identical copies of each other and setup the same way so that if one goes down, I can just pick up the second one and continue photographing my couple without any down time. One of the reasons I purchased the D810 was because it offered Dual Memory Card slots - Compact & SD Flash Memory Cards. I prefer to use the secondary slot as my in-camera backup as it automatically writes a duplicate JPG version of the RAW file that is being written to the primary card. You can set this up to be your "run off" card, duplicate RAW copy and sort forth. There are a few setup options and this just happens to be the best for me because if anything happens to my Compact Flash card (RAW) I will have already have a duplicate copy (JPG) on my SD Flash card. 

Compact Flash Cards - The ONLY brand I use is SanDisk for my memory cards. They actually invented the technology so why not stick with the best, right? I purchase a few new Compact and SD Flash cards every year and retire cards at the beginning of every wedding season. I label each new card with their purchase year so I can easily see which ones need to be discarded.

Card Reader - I have two card readers - Lexar USB 3.0 and the EC Technologies Card Reader in Rose Gold (which I keep out on my desk and use the most). The Lexar is a bit faster than the EC Tech but that's ok with me because well, it's just prettier.

Hard Drives - Western Digital is my favorite brand for portable hard drives. I've been using them for as long as I can remember and (knock on wood) I've never ever had a problem. My preferred model is the Western Digital Passport 3.0 USB because it's so light, compact and well designed. I purchase 2-3 per year and rotate them throughout my entire backup process.

My Backup and Archiving Process:

Import, Sort and Copy:
After my wedding or session, I import my photos using Photo Mechanic. Once the import process is completed, I will sort by Capture Time and then Rename the photos to be in the correct order. I will do this for my own photos as well as my second photographers. Next, I copy the Photo Ingested folder (a Photo Mechanic term) and copy it to my RAW FILES hard drive. I like to keep a clean, untouched copy of the RAW files in case of any data corruption once my editing begins on my computer. I keep the RAW files for a certain amount of time and then replace the data on the drives.

Culling & Backing Up:
A few days after the wedding, I will sit down and cull the images to a smaller more manageable amount of files. I will create the couples folder layout and copy the selects to their images folder. Next, I will copy their folder to TWO hard drives (Backup A and Backup B) that are exact duplicates of each other. This way, I have two working backups of their images and complete working Lightroom Catalogue at any moment in time. Each week I will go through my working files and copy the new data to each of these two hard drives. How do I know what I'm working on? I label my "in progress" folders in Green and my "completed" folder in Red. You could use Carbon Copy Cloner to do the same exact thing. Finally, I will copy the FINAL folder one last time to the hard drives for safe keeping.

Uploading and Delivery:
Once the images are completed, I will upload them to my online hosting provider and deliver the final images to my clients. They receive the high resolution jpg images with all of their collections. Their images are hosted anywhere from 90 days to a year and each receive a 30 day reminder that their gallery is about to expire. As soon as I deliver their gallery, it becomes my couples responsibility to archive and back up their images. After their gallery expires, I move their folder into my online archives which gives me another yet another backup of the final images. If a past client contacts me because they lost their images, there is a fee to reinstate their gallery.

Backing Up My Computer:
I am a Macintosh user and use Apple's built-in backup software called TimeMachine. I run this once a week to have a complete backup of my computer on a separate Western Digital Passport hard drive. In the rare chance my computer were to fail, I could buy a new machine and install the latest version of my TimeMachine backup and could (potentially) have little to no downtime. I always like to be prepared for the worst!

Offsite Archiving:
The last and final step to my backup process is to physically take my hard drives off site to my safety deposit box at my bank. I like to have at least one hard copy some place other than my home just in-case of theft or fire. But, if the bank burns down, there isn't much I can do about that now, right? So I like having my online and off-site archives to work together.


Want more Tea? One-on-One Coaching is now available! Find out more here!

Stay in the know! Subscribe to our newsletter, podcast, join our facebook group and be sure to follow @jainekershner on Instagram for the latest Tea with Jainé IG TV episode.

Greetabl Discount - Save 20% Greetabl and Greetabl Insider Pro. Use code JKERSHNER at check out.

Interested in collaborating? Please fill out our contact page and say hello!

What's in My Camera Bag for Every Wedding

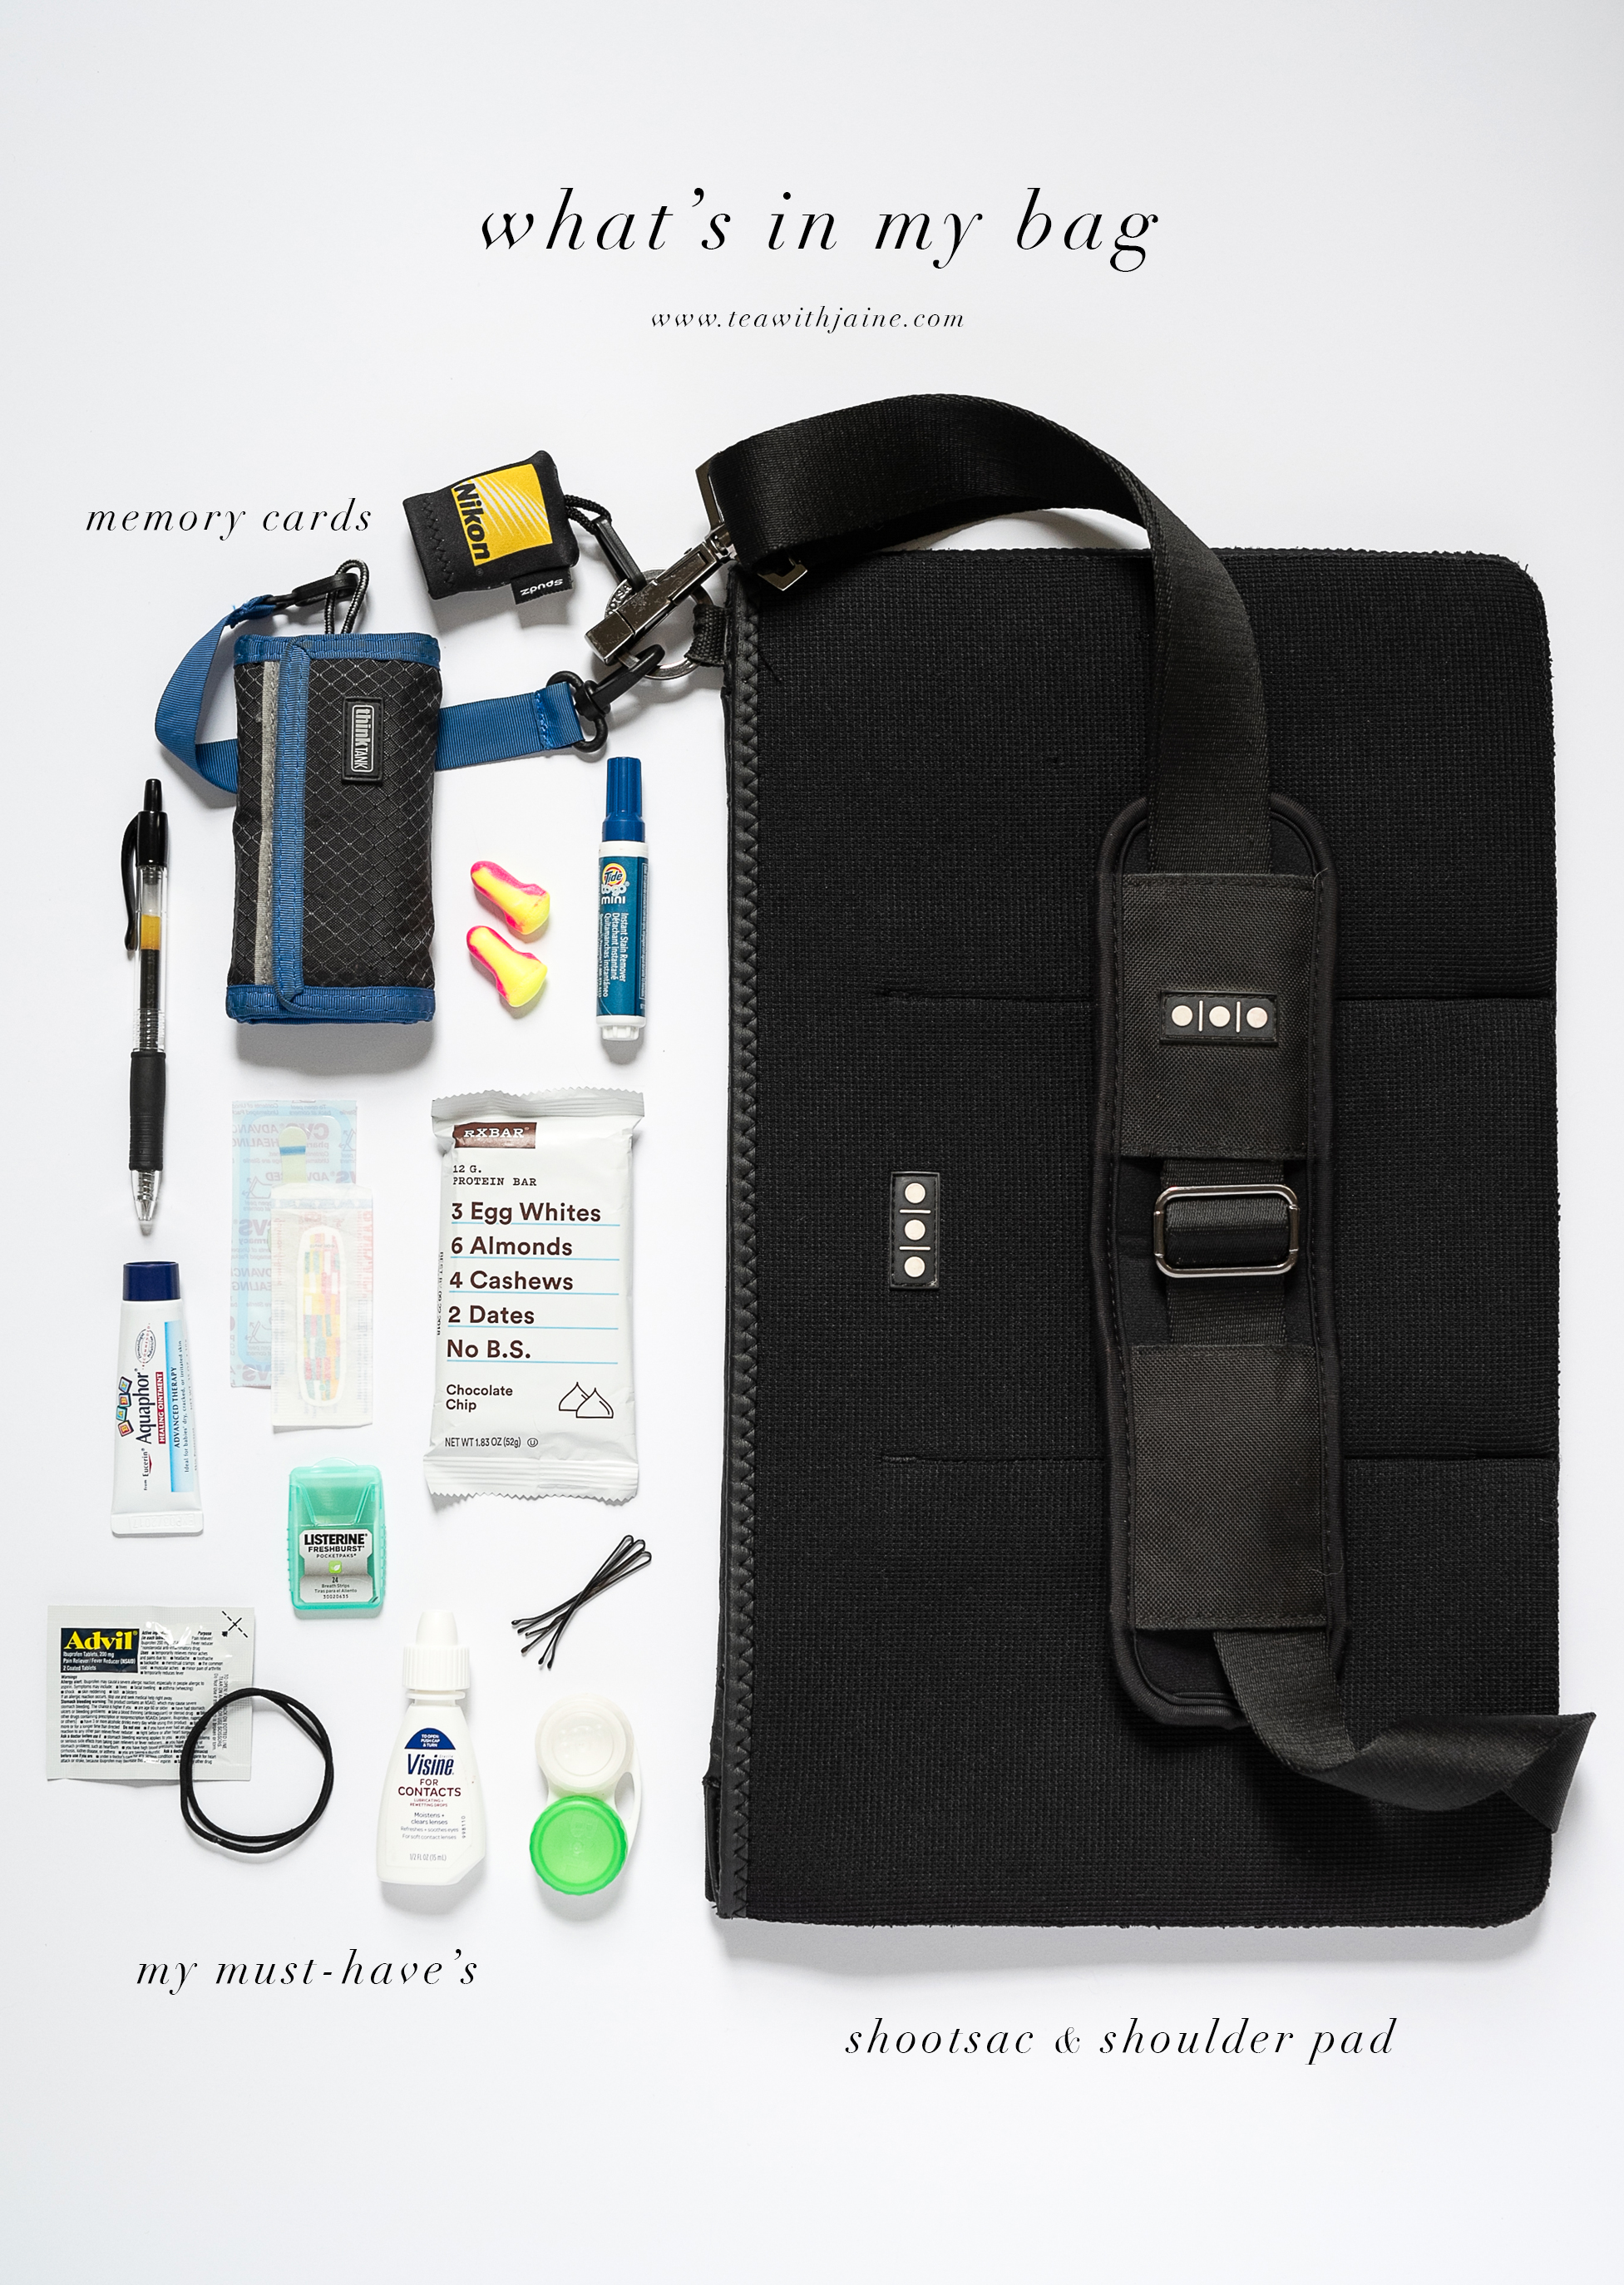
As I was preparing for my first wedding of the season, I thought it would be a good idea to show you exactly what I carry and wear to every one of my weddings. These are things that over the years as a wedding photographer, I know I need to function and work efficiently throughout the course of the day. These are simply my must have tools and I hope you find these tips helpful!

What's In My Camera Bag for Every Wedding

1 - Shootsac Lens Bag and Shoulder Pad - I absolutely could not function without my crossbody camera bag. It carries my lenses, batteries, memory cards, lip balm and much more... I've had a Shootsac from the very beginning of my wedding career and highly recommend it. It's made from scuba material so it's very soft and comfortable on your body. There are six pockets (3 on each side) that allow me to carry all of my gear. I usually will have 3 lenses on me - two in the Shootsac and the one on my camera - at all times. I also created a system by dedicating specific items to certain pockets because it can also become a "black hole" where everything and anything will get lost :) I would strongly suggest buying the additional Shoulder Pad to keep the bag comfortable on your shoulders throughout the day. The crossbody strap is adjustable and I wear it at hip height to easily switch out my lenses and grab my memory cards. If anything, this is my MUST HAVE item for every single wedding photographer out there.

2 - Memory Card Holder - I always have my memory cards on my person the entire course of the wedding. I never want them to get out of my site and chance being lost or stolen. I bought one a Think Tank Pocket Rocket to clip securely on to my Shootsac and I can easily pull out the pouch and switch cards in a hurry. 

Quick Tip: Every time I change my memory card in my card pouch, I turn it backwards before tucking it away in the pocket. This way, I can visually see that it's been shot on and will reach for another card when I'm in a hurry which is all of the time on a wedding day!

3 - Lens Cloth Clip - I like to keep a lens cloth on me at all times and love this clip on lens cloth from Nikon. I also use the Zeiss disposable lens wipes (not pictured) throughout the day. I usually by a box each of 100 each wedding season.

4 - Extra Batteries for my Camera & Flash (not pictured) - I use the Storacell Battery Caddy to organize and store my AAA batteries. These great plastic caddy's hold my loose batteries all in one spot. I put one in my bag at the start of each reception just incase my flash dies in the middle of the dance floor. I also keep an extra set of batteries for my digital and film camera's in my Shootsac as well. You never want to be in the middle of session or important moment and have your camera turn off because you are out of power. I always like to be prepared!

5 - Portable Phone Charger (not pictured) - It's no secret that I like to story on my Instagram (hey, this is how all of this happened, right?) so I carry a small portable iPhone charger. I like this Anker Portable Phone Charger in white. Also, I feel as if you can never find a power outlet inside the reception venue so it's a good idea to have your own.

5 - Ear Plugs - I started wearing earplugs during receptions because I damaged my right ear at a wedding several years ago. I walked past a huge speaker during the ceremony and caught a loud sharp sound in my ear resulting in a damaged ear drum. I had to go to the Dr.'s and after a few tests, he said my ear drum was damaged and would heal on its own. I had a bit of vertigo for almost a year but it eventually went away. Now I always wear earplugs and have several pairs on me at all times.

6 - Protein Bars - I always say photographing a wedding is like running the marathon. You need to keep your energy up! I recently discovered RxBars and I'm in love with them. They have very few natural ingredients and are super yummy. The sea salt chocolate are my favorite (not pictured because I ate the last one!!)

7 - Wedding Photography Timeline & Pen - I always have a printed copy and working pen on me throughout the day. This also helps get through family photos very quickly because I can start right away since I already have the list on me. Smart!!

8 - Everyday Necessities (the must have's) - Bobby Pins, Band-aids, Breath Mints, Advil, Contact Lens Solution and container, Tide-to-Go Pen, Hair Ties, and LIP BALM. I seriously could not photograph a wedding without lip balm :) 


Want more Tea? One-on-One Coaching is now available! Find out more here!

Stay in the know! Subscribe to our newsletter, podcast, join our facebook group and be sure to follow @jainekershner on Instagram for the latest Tea with Jainé IG TV episode.

Greetabl Discount - Save 20% Greetabl and Greetabl Insider Pro. Use code JKERSHNER at check out.

Interested in collaborating? Please fill out our contact page and say hello!

Top 3 Tips to Culling Wedding Photos Faster

It's true what they say about being a wedding photographer, it's 10% photographing weddings and 90% everything else. You spend a lot of time in front of the computer vs. behind the camera which can be frustrating. Over the course of my wedding photography career, I've picked up a few helpful tips and tricks on how to cull and edit my photos faster which I'm so excited to share with you! Here are my top 3 tips on how to cull your wedding photography faster.

CullingWeddingPhotosFaster.jpg

No. 1 - PHOTO MECHANICby CAMERA BITS - This is hands down my NUMBER ONE recommendation for ANY photographer who photographs events, weddings or simply takes a large amount of photos at one time. The magic of Photo Mechanic is that it processes your RAW files instantly and loads the previews on your screen faster than you can blink. This makes the process of selecting your best photos incredibly fast and efficient. If you were to import your photos using Adobe's Lightroom, you'd be sitting there waiting for the files to render before you could even start your cull. You'll be waiting a painfully long amount of time before you can even start to select your photos - it's incredibly slow. Photo Mechanic is 100% worth the financial investment because it will speed up your workflow by hours and you need that time to get back out there and photograph your clients!

No. 2 - SHUTTLExPRESS by CONTOUR DESIGN - I know, this looks a bit intimidating but trust me you will learn to love it. The ShuttleXpress is a keyboard extender with programable buttons to help speed up your workflow and edit as fast as possible. I used the ShuttleXpress with Photo Mechanic and Lightroom. Since it's a programmable device, you can set it up with multiple software profiles which is amazing! For culling in Photo Mechanic, I use the ShuttleXpress to pick (T key) my selects which saves me time and my hand from cramping up by using my keyboard. In Lightroom, I use the ShuttleXpress mostly in the Develop module to copy & paste my settings, crop and rotate images, pick and flag my photos and so much more. Using the ShuttleXpress allows me to use keep one hand on the mouse and the other on the ShuttleXpress without ever having to touch the keyboard. I never have to look down to find a key to use a keyboard shortcut, which slowly eats away at my editing time by taking my eyes off of my screen. I've been using this device for several years and by now, it's second nature to me. I simply cannot work without it. 

No. 3 - START BACKWARDS - This is a tip I picked up from another wedding photographer and think it's absolutely genius! For wedding photographers, the end of the wedding usually means reception photos. LOTS and LOTS of reception photos which may or may not be your favorite part of the day :) To quickly get through this section, I suggest starting at the end of the wedding and moving your way backwards through each part of the day. This will speed up your culling time and you'll also move into the ceremony, portraits, getting ready sections more quickly. Also, specifically for digital photographers, you might take a few shots until you are happy with the final photo, which means you might have 2-3 images before you get to the final shot. If you start backwards, you will see the best image FIRST and skip over the rejects so much faster. This is such a simple tip but has efficient impact on saving you time in your culling process.

I hope you found these tips helpful but I want to hear from you! What are some time saving tips you've discovered while culling your images? Please share in the comments below!


Want more Tea? One-on-One Coaching is now available! Find out more here!

Stay in the know! Subscribe to our newsletter, podcast, join our facebook group and be sure to follow @jainekershner on Instagram for the latest Tea with Jainé IG TV episode.

Greetabl Discount - Save 20% Greetabl and Greetabl Insider Pro. Use code JKERSHNER at check out.

Interested in collaborating? Please fill out our contact page and say hello!